DIY Play Make-Up

I've been wanting to do this for a long, long time, and there's never been a better time to do it than NOW!! We are moving in a few days and I am in serious purge mode! I knew that if I didn't tackle this DIY project before the move that it wouldn't happen at all.

And then I would be sad and regretful that I didn't get it done!


So here's what you'll need:


-old, expired, or unused make-up containers 

-old nail polish

We all have old make-up lying around. Or make-up that you think you'll use again, buuuuut you never do! Most make-up expires in a year or less, especially eye make-up! I had a friend in high school who used some of her mom's old eye make-up and ended up with an eye infection. So go dig around in your make-up stash for some things you can upcycle into a fun toy for a little girl in your life!

Oh, and it doesn't have to be old nail polish; that's just what I had! Old, separated, nail polish in a forgotten part of my bathroom. I just don't paint my nails that often! You will probably use about half a bottle depending on what type of container you are trying to fill, so I wouldn't use your most expensive polish!

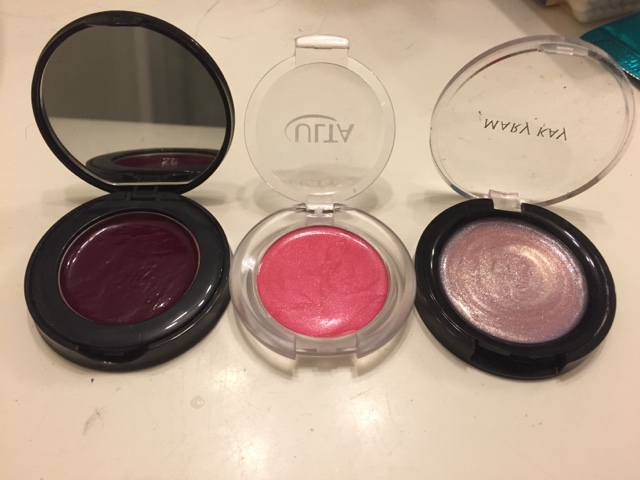
Here's my stash of old make-up:
Don't judge my dirty bathroom counter. I'm moving...remember?? Oh and I have a young toddler running around, and I'm 7 months pregnant!! PRIORITIES, mm kay?!

Next you'll want to scrape out all the old make-up. The cream powders were a cinch to wipe out - I just used toilet paper and a Q-tip!

Some of the pressed powders didn't come out so well. So for the sake of time and my sanity, I didn't waste my time picking out the corners. But it's totally doable with a little more patience than I had at the moment!

I gave up on this one.
Here are my containers, all cleaned out!


And here's the ginormous bag of abandoned nail polish.
I can't even remember how old some of the bottles are!


Now the fun part: pick a color for each make-up container and pour a THIN layer into the bottom.
It needs to be a THIN layer so that it can quickly and thoroughly dry.


Let it dry for at least an hour. I would go back to it after I had a chance to escape my moving to-do list. Add another layer after the nail polish is no longer tacky

Remember, THIN layers are best!

Keep adding until the container fills up to the desired height.

Here are mine:


My daughter is way too young to play with and appreciate these yet; it will be probably at least a year before I give them to her to play with. I also have some cheap brushes I got for free with a purchase that I'm going to let her use as well. I can't wait to play dress up and beauty salon with her!!

Aren't they just adorable?!


I mean, you can't get more realistic-looking make-up!

And the best part is, is that it was COMPLETELY FREE since I used what I was just going to throw out anyway!


Share with anyone who has a little girl who needs play make-up!

Comments

Popular posts from this blog

Let's Play Series: Summer is HERE!

I'm trying to get my life together (I feel like I'm always saying this!) and I've come up with a summer schedule for my 2 and 3 year old! I wanted a schedule that allows for lots of playtime and exploration in a laid back, no pressure kind of way. I didn't want to be on a specific timeline, so I only chose a few things that require a specific time commitment. The rest of our schedule is on our terms! This is the first summer that I feel like I'm ready for something structured. My kids are 19 months apart, and my youngest is now about 2.5 and I'm not tied down with needing to breastfeed a baby or rushing home for nap times (car naps are the WORST!!). I'm still pretty rigid with nap times, but they are old enough that we can be a little more flexible and it's not that big of a deal anymore. Last summer, my husband was deployed, so trying to do things by myself all the time with a 1 and 2 year old was truly a struggle some days. So I am READY to embrace a...

The Long-Anticipated Blog Name Change!!

I started my blog in May 2010, and I didn't even write a single post for nearly 2 years. I wanted a blog, but I didn't know what I wanted to do with it . I remember just sitting in my living room, newly married, and just slapping a name on the blog: Domestic Diva Domain ( I love alliteration, okay?! It's the cutesy preschool teacher in me!). I didn't love it, but I thought, it'll do. Fast-forward a few years, and I dabbled in different topics, such as recipes, DIY tutorials, a few random updates about my life, and some Wordless Wednesday posts with just photos. I spent some time trying to understand how to format a blog and realized I'd never  understand coding! Everything I  know about blogging was learned from countless hours basically doing trial and error using the provided templates. I linked up a few of my posts with Pinterest and that got me A LOT of views! One of my posts has been linked in many online articles about creative storage for the home. I...

Making Myself A Priority: A Journey

You know what is kind of cool? Every time I work out, in the middle of all the sweat and struggle and discomfort and thoughts of "this is hard; I want to quit", I also have these really amazing thoughts of perseverance during hard times. It's almost like the clouds of negativity dissipate in my mind, allowing positive thoughts to filter in. I kind of bask in the high of my endorphins, and let the inspirational thoughts float around in my head! Back when I went to the gym, I would get these thoughts too. I always remember thinking that I wished I had a way to blog while running on the treadmill because I would get these inspirational thoughts and I wanted to write them down! I would finish my workout and basically run to the nearest table and chair just so I could whip out my phone and jot down my thoughts! And now, I'm sitting on the edge of my chair, all sweaty, post-workout, to get this all written down! My thoughts never seem to come out as fluidly if I wa...